Showing posts with label Sally Hansen. Show all posts

09 November 2011

Dia daoibh!

So yesterday I wrote about Sally Hansen Salon effects and how to apply them. Today I'm going to show you the results on how they lasted. On my left hand I used a clear topcoat to see if it would help for the polish strips last longer. I used Sally Hansen Hard Nails. (which isn't actually designed as a topcoat....but still!) My right hand, I just left as it was after the application.


So here are my results. You can click to zoom in further.
DAY 2

DAY 5
 Between day 4/5 is where I had my first chips on my right hand on the 3rd nail. This was after having a shower.
DAY 6
On day 6, the second nail on my right hand chipped.
DAY 7 
Day 7 was the second day I had a shower and there was (very slightly) a bit more chipping to the same nails on the right hand. As you can see, this is where you can see my nails starting to grow, so you can see between my skin and my nails.
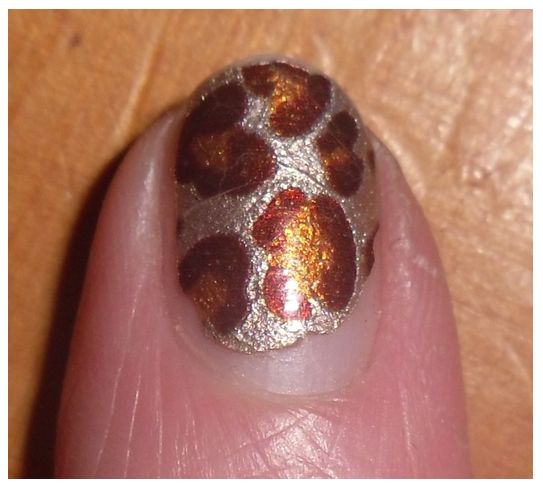
DAY 9
 Day 9 was my final day. Although the left hand (with the topcoat) lasted brilliantly, my nails had grown quite a bit at this stage. You can see this in the picture below. Also, the only tiny slip on my topcoated nails were tiny cracks on my index finger.
Here you can see how much my nails had grown!!
No bad at all eh!? They definitely last longer than regular nail varnish in my opinion. Now, I am right handed which might lead you to think this is why I was more worn on the right nails. I'm not so sure though, I'm pretty ambidextrous in day to day life! I would highly recommend a top coat to make the Salon effects last longer.

Slán

These products were sent to me for free from Sally Hansen's PR Team for reviewing purposes. All opinions above are completely my own, 100% honest thoughts on the product.

08 November 2011

Dia daoibh!

So these babies from Sally Hansen having been flying around the Irish blogging community recently. They should be in shops now and they go by the name of 'Salon effects'. They are basically strips that are actually a type of.... I guess you could say solid nail varnish! I was sent these two sets to try out a few weeks ago.

L - Frock Star        R - Kitty, Kitty
Here's what's included in one pack: Instructions, 3 sided emery board, wooden cuticle pusher and 16 sealed strips.


So I'm gonna get straight into the application process, which is indeed quite straight forward. First off, make sure to begin with clean polish free nails.


  1. (If desired - some people do not like doing thins) Start off by gently pushing back cuticles (where your nail and skin meets) This is just to make sure your nails are shapely and looking as long as possible.
  2. File your nails to the shape you like using the pink side of the emery board.
  3. Buff the nails (back & forth motion) using the other white side of the emery board. This is to make them as smooth as possible.
  4. Choose what strips will fit your nails the best. They are rather large so really it doesn't make much of a difference (they more a less all overlapped my small nails!)
  5. Remove the clear protective plastic from the strip. 
  6. Then remove the backing paper so you are left with just the strip and pull off the silver tab.
  7. Apply to the nail. It is easiest to place the strip near the cuticle, hold it in the middle with another finger and gently stretch the strip to cover the nail.
  8. Use the flat side of the wooden cuticle pusher to push down and bond the strip to the nail around the edges. You can also flatten down with your fingers. As you can see in the picture the strip was too big for my nails so again you can use the cuticle pusher to gently scrape away overlapping edges.
  9. File towards the middle of the nail on both sides to remove the excess strip using the orange side of the emery board.
  10. Eh voila! Looks just like a painted nail, no thickness or weird feeling!


 As 16 strips are included, I had 6 left over so I have wrapped them in tinfoil in the effort the prevent them from drying out! I can use these for "accent nails" I guess :)


Overall I really am impressed with these. I've gotten so many compliments on them and people presume I had them done at the salon as they look so intricate! They claim to last for 10 days. I have tested this out and will be posting the results tomorrow :) It does take time to put them on however. As a first timer it took me about 30 mins. (I was taking pictures though)

Sally Hansen Salon effects are available from selected pharmacies, department stores and grocery stores nationwide for €8.95. They come in the following 9 shades:

Top L-R: Frock Star, Glitz Blitz, Blue Ice, Girl Flower,
Bottom L-R: Wild Child, Misbehaved, Laced Up, Kitty, Kitty and Check It Out.

The only thing I don't like about them so far is the mess I left behind!!


Slán

These products were sent to me for free from Sally Hansen's PR Team for reviewing purposes. All opinions above are completely my own, 100% honest thoughts on the product.


Follow @FitznBitz on Instagram!