Showing posts with label Hair. Show all posts
Showing posts with label Hair. Show all posts
08 May 2016
03 June 2013
Click >HERE< to see my previous Viviscal posts.
Dia daoibh
So here we are. 3 months later and I have finished my Viviscal Trial. I have summed up my whole experience in the video below which includes some clips throughout the time I used the tablets, shampoo and conditioner. Here are the pictures of the growth of my hair.
Dia daoibh
So here we are. 3 months later and I have finished my Viviscal Trial. I have summed up my whole experience in the video below which includes some clips throughout the time I used the tablets, shampoo and conditioner. Here are the pictures of the growth of my hair.
27 May 2013
Dia daoibh!
Here's the most recent update of my hair. The below pictures were taken on the 22nd May, which makes it almost 12 weeks of taking Viviscal tablets and using the Viviscal shampoo and conditioner. It's a shame that the growth is not as apparent in the photos as it is in real life. The first pic is prob the one to go by. As you can see I've lost the red colour to my hair.
26 May 2013
Click >HERE< to see my previous Viviscal posts to catch up on my journey.
Dia daoibh!
Here's another (late-apologies. A more updated post is coming this week also) update for those of you following my Viviscal journey. Below are some photo's from last month, Friday 12th April ie. 6 weeks using Viviscal tablets, shampoo and conditioner.
Hair Health
First of all, my hair continues to be mega mega shiney. I've received so many compliments on how health and shiney it looks which is really great.
Hair Loss Update.
My hair loss has reduced significantly since I started. The below picture shows how much now typically falls out after a shower.
15 March 2013
Click >HERE< to read my first post of this hair growth/health journey.
Dia doibh!
So I have been taking Viviscal tablets and using the shampoo and conditioner now for two weeks. So far I haven't missed one tablet and fingers crossed it stays that way! I have been using the Viviscal shampoo and conditioner every time I wash my hair.
A week after I had my hair cut/my first post I had my front layers trimmed and bit shorter and thinned slightly. It was bit front heavy so I asked the hairdresser to shorten it.
01 March 2013
Dia daoibh!
I'm about to partake in an exciting hair journey. You might have heard me speak of Viviscal in the past. Well today I will start a solid 3 month trial of the scientifically proven hair supplement along with the specialised shampoo and conditioner. I will be tracking my progress along the way and will be keep you updated here on my blog. This May, Viviscal will be presenting the findings and conclusions from their clinical trials (ie. my results) at the 7th global world congress for hair research and on the back of that we want to make May "Viviscal's hair aware month."
MY HAIR.
To give this trial a fair run I have literally just had my hair cut and coloured today! As you can see in the picture below it is at shoulder length and I have zero roots!
01 November 2012
Dia daoibh!
I have new hair!!! Well; not new hair, but a new colour!! Have a read of >THIS POST< to see lots of before and after pics! I visited Peter Mark Salon in the Crescent Shopping Centre where Marcella revamped my hair. She was wonderfully helpful and thorough whilst doing my hair so I highly recommend her to anyone. Here's how I went from A to D!
My hair is naturally very dark brown. I have been visiting salons and dying my own hair for years.... I'm talking about 10 years so as you can image there was A LOT of colour build up so there were different bands of stubborn colour in my hair. I also had roots as I was purposely leaving it grow out. Although not very obvious in photos, in person I had 4 different bands of colour in my hair so obviously this was gong to cause a problem if I wanted to go lighter. It all needed to be evened out before dying so I had my hair "stripped" or "cleansed" as it's known professionally.
Marcella used a water cleanse on me. There is also a full on cleanse which can be quite damaging so she wanted to avoid this if at all possible....
Dia daoibh!
As some of you may know if you follow me on Twitter, Facebook or Instagram, yesterday, I went to get my hair done. I had an idea in my head that I wanted to go lighter to a light copper auburn shade. Have a read of >THIS POST< to get a step by step journey! I visited Peter Mark Salon in the Crescent Shopping Centre after being lucky enough to capture a "bubble" from the new INOA App that L'Oreal released to promote their new hair colouring system. My colourist and stylist on the day was Marcella who really done a wonderful job. To be honest I have heard both positive and negative reviews about Peter Mark Salons, but my experience was a great one. I was welcomed and Marcella went through what I wanted, she gave me her opinions and bit by bit my new hair came together. Here are some (lots of pics).
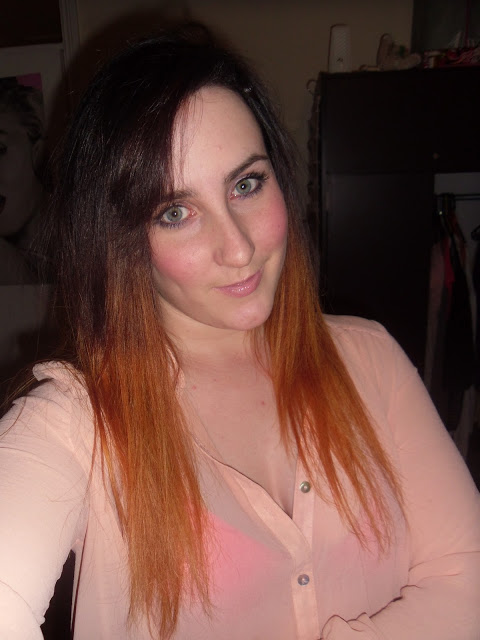
I started off with dark brown which had a reddish plum tint to it and it gradually fell down to an ombre'd copper kind of colour. Here is the before and after!!
And some more up close pics...
18 September 2012
Dia
daoibh!
Today
I’m going to speak to you about my 1-2 month experience with Viviscal Maximum Strength. Viviscal is the world's leading brand of dietary
supplements for the treatment of reversible thinning hair and hair loss for
both men and women and good news to add to that; it’s made here in Ireland,
You take 2 tablets daily with food. It’s
recommended to take them for a minimum of 6 months or until the desired results
have been achieved. Now priced at €49.95 for a one month supply I know this
will not appeal to all. I took them on and off over two months and here is the growth difference
in my hair....
17 September 2012
Dia daoibh.
One of the newest and most exciting hair colourant products in my opinion is on shelves now. L'Oreal Paris Préférence Wild Ombrés is "the first ever mass market dip dye". In the past 2-3 years in particular Ombré and Balayage have been huge. I myself have dabbled and am still rocking the two toned style. In the past it has been possible to DIY it at home using bleach/peroxide products. I'm aware that these two word scare the life out of people so I therefore believe that L'Oreal have made a great move at producing this product.
15 March 2012
Dia daoibh.
Men. I guess some of them like to take care of their hair too. I tormented my boyfriend James to put some Schwarzkopf Professional products to the test and after some final words of encouragement (perhaps a bribe or two!) he agreed.
Now James is not a fella for his grooming. Don't get me wrong, he takes care of himself, but only to the bare minimum.... meaning he's always clean and smells nice, but that's about as far as he goes. He doesn't use face wash, moisturiser, I won't even mention fake tan or teeth whitening because he'd have heart failure at the thought of it!! But one thing he does do daily is his hair. It's a short clean cut (half back and side and a 1 or 2 on top?? Something like that!) so before these products came his way he used Dax which is a thick clearish wax. He doesn't exactly "style" his hair but likes to give it a shine and put his fringe into place. Recently though he mentioned and I noticed that he had a few spots on his forehead and I thought it was from his Dax, so these products couldn't have come at a better time. Now that you know a bit about the guinea pig, lets move on to the products.
What they say:
14 December 2011
Dia daoibh.
Today's post is going to be about my TIGI Pro Fat Curl Stick (otherwise know as a curling wand!).
I bought this from Cloud10Beauty after I was ever-so lucky to win a €50 voucher from Beaut.ie a while ago. Instead of buying a few bits and pieces, I decided I wanted one good thing. I had just ombred my hair so decided to go for a curling wand as ombred hair tends to look best when curled.
I wanted a large barreled one so that I could create loose curls so I went for this baby priced at €47.95 ($100/€77 from the TIGI website!!! Yoyza!) You can also get a "skinny" version for tighter curls for about €43.
Features:
- Unique tapered ceramic coated barrel
- 25 adjustable heat settings up to 195°C
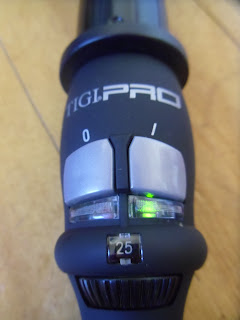
- On/Off indication light
- Swivel base to avoid cable tangling
- Light-weight for perfect control
- Extraordinary Sharpness
- Produced in the finest high-quality, non-corrosive stainless material.
New to their website is THIS set which is the same wand but included you get a serum with essential oils combined with thermal and environmental protectants which gives hold and control for defined curls; all for a cheaper price of €42.95!! Bargain!
This was my first time using a curling wand without a clamp. I found it really simple to use. The one negative I would have about this particular curling wand is that it doesn't come with a heat protectant glove. I think these should be included with all of these types of wands. In saying that though, I burnt my forehead worse than my fingers. You can see a little round burn on my forehead above!! Nothing major, will just take a little getting used to!
Here are my results after giving a quick whiz through my hair!:
These as you can see are really loose curls at the ends of my hair. The beauty about this wand in particular though is that you can achieve smaller curls too by using the tip of the wand as it is smaller. The wand itself is easy to use. It came with instructions which of course I read..... *cough. As I said it has 25 heat setting so depending on how fine/thick your hair is you can alter it as needed. It has a simple red for heating and green for ready indicator.


 |
| Size comparison to my head! |
Overall I'm really happy with my "Fat Stick!". Now I just need to get into the habit of using plenty of heat protectant spray and stop burning my own face/fingers!!
Slán!
16 October 2011
Hi :)
So, if you follow me on TWITTER you might have noticed me tweeting about doing my hair last night. Well, I did. It involved bleach/peroxide..... scary words to a lot of people, so I decided to track my process with pics for you lot. I had an idea of what I wanted to do and that was go dark on top and light on the ends - otherwise known as Ombre. I like to DIY, so I did! Here's how it turned out. In real life it's not as red toned. The tips are more of a strawberry blonde.
Ok so here we go. This is what my hair looked like before. THIS is how I got my hair from dark to this colour. (very much faded since then though)
Here are the products I used (which I bought in boots):
- Schwarzkopf LIVE Color XXL in the shade 89 Bitter Sweet Chocolate (€7.29)
- Jerome Russell Bblonde Cream Peroxide (12% strength 40 vol) (€2.29)
- Jerome Russell Bblonde Powder Bleach (€4.90)
Out comes my old faithful Lidl hair dye top! I find it particularly handy because it's a zip top so it's handy to take off when product is in the hair and it also has a collar to shield the product from my skin. It's also fleecey and nice! :)
I used my own latex gloves (well I robbed em from my mammy who's a nurse Thanks mam!). The ones that come with these box set are fairly ridiculous and I knew I would need some sort of specific placement - especially for the bleach.
First I went in with the brown dye and done the usual but just left the ends. I wanted to leave them as light as possible for the bleach to take to. I left it in for 30 minutes as I wanted to make sure it went completely dark so that I won't be getting roots! Here's how that turned out.
- Next was the Bblonde-ing! 1 pack of bleach for one bottle of peroxide. I just mixed it in a chinese take away box - classy buurd I am!
- I applied this to my tips (about 2-3 inches) and covered it in tinfoil to enhance the heating and lifting process. I left this for about 20 minutes.
- I then took off that foil and re-applied more and moved it further up to about midway length of my hair. I also applied a little to some front layers. I covered up in tinfoil again for another 20 mins.
- I then diluted the rest of the mixture and streaked it though everything I had done. (not sure if this made a massive difference but it seemed like a good idea at the time!) I left that for about 10 minutes
- I then rinsed it out. Shampooed my hair, used the conditioner from the brown hair dye and left it for about 10 minutes, rinsed and dried.


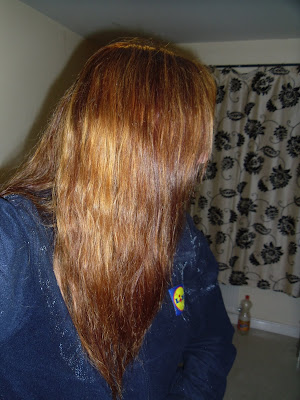
And BAM, that was it! It's not very gradient looking though. I can't seem to photograph the difference between the tips and the middle bit. My hair is quite resistant to lightening so perhaps this is as far as it goes. It says you can leave it on for up to 90 minutes but I didn't want to go blonde or damage my hair any further. I may throw in a bit of toning shampoo and see what that does. Will keep you updated!
You can kind of see the lighter colour to the left further side compared to the reddish tone at the from right. Also tried to show you below.
For now I'm happy with the change. Not bad for under €15 eh!!? I hoping I won't have to touch it now for a while as my roots should be about the same colour as the dye I used. Fingers crossed it won't fade out like last time! What do you think? Yay, nay? Thanks for reading :)
24 September 2011
Morning all.
So I'm going to review the Tangle Teezer. If you'd like the know the scienc-ey bit for the unusual looking hairbrush click HERE to visit the website.
| Source |
Here are the claims
"Tangle Teezer is excellent for detangling both wet and dry hair.
Tangle Teezer gives a blissful, relaxing head massage even for the most sensitive scalps.
Excellent results are achieved on even the tightest curls and afro hair
Daily brushing refreshes hair for a sleek style and helps to smooth the cuticle for increased shine.
Tangle Teezer minimises hair breakage, so over a period of time you will notice your hair feels thicker and looks healthier"
I don't believe it gives you a nice head massage! If anything the bristles are a tad scrapey on the scalp.
Increased shine!? Nope! Maybe the claim is more of a general one ie. that brushing in general helps with shine, but the Tangle Teezer itself does not miraculously add shine! I would agree that it minimises hair breakage though - especially at the ends of your hair.
It comes in several other colours and also in other sizes and forms.
| Source |
 |
| Source |
I have some things I like and some things I don't.
It's all a bit exaggerated on the website and in the video if you ask me. At the end of the day, it is just a funny looking brush and it's not going to make an absolutely outstanding difference to your hair! But what I do really like about it, is when I use it on wet hair. Now I know you're not supposed to brush wet hair, but this is a beauty rule I break! With a normal brush I was noticing a lot of my hair falling out when brushing and my hair (which is reasonably long) would be quite knotty at the ends. The Tangle Teezer is ideal for this, the best I have found. It combs through the knots much easier than a regular brush and I have definitely noticed less hair shed.
As for using it on dry hair; I'm not fussed at all. I don't think it makes it much easier than any other brush. To be honest I rarely brush my hair when it's dry anyway, I usually just finger comb it in the mornings so this is why I am so pleased to have found a great hairbrush for wet hair!
Also, when using it on wet hair, if I apply product (heat protectant, creams etc) I love to brush it through to spread it out throughout my hair.
Overall I am really happy to have found a brush that is great for using on wet hair (even though it's bold!) But if I'm doing it, I might as well do it as gently as possible, so Tangle Teezer - thumbs up for that! Otherwise as a "normal" hair brush on dry hait......meh!
30 July 2011
Hey everyone.
So I'm here to speak about my hair again!! Yes I have dyed it!! I did really like the result of my LAST ADVENTURE, I decided it was time to go again. I may have mentioned that the colour over time was fading. Well actually it was more "changing" than "fading"! I started getting roots and also my hair was looking dry - although it wasn't necessarily feeling dry which is kind of weird.
So when the opportunity arose for me to try the new AVON hair dyes, I jumped at the chance. I was contacted by the PR reps for Avon and offered to try out the 'Advance Techniques Professional Hair Colour'. I chose the colour '6.56 Light Mahogany Red' (which I recently noticed that Samantha from PIXIWOO used also!!
I waited until I came home from Holidays in Donegal as I wanted it to be freshly coloured for my photoshoot!!! (I will blog!) So here is what is included in the pack.
1 - Pre Treatment
2A - Developer Lotion
2B - Creme Colourant
3 - Post Treatment
Gloves
Instructions
So basically the same as what you would find in any at home hair colouring kit - apart from the Pre Treatment sachet. This is a white lotion to prep your hair for the colourant so that it applys evenly and more vividly. This smelt lovely and left my hair looking as follows
The developer and colourant mixed to a purple colour which surprised me a bit and gave me the impression my hair would turn out more plumish than reddish, but it didn't, so don't worry if it looks a strange colour or if it seems to darken a lot on your hair.
Now here is the only thing that I wasn't too impressed with - even though it's not major!! The mixture seemed to separate a lot. I had to keep shaking it up so that it was all mixed in properly as I was nervous that if I didn't, some parts might be different colours to the rest. This is probably the only "negative" I have to say about the product, which would not put me off in the slightest really, but I just said I'd mention it.
I left the colour in for 30 minutes, hopped in the shower and used the post treatment. If you have ever used any of the Advance Techniques Shampoos or Conditioners; that is what this smells like (which is good btw!!) And here is the final outcome!
I was delighted with it. I have been this type of colour before and I really do love it. As you can see; it turned out super shiney and it was so soft also! Perfect!! With regards how much you'll need, the mixture seems to blend really well and covered a lot at once for some reason. It's like it glided on and smoothened out to cover more that any other home colourant I have used so I ended up only using 1&1/2 bottles. It also claims to have 100% grey coverage but I can't comment on that.... yet!!
Each pack is currently €8, and also at the moment if you order any colour you get a free Colour Protection Lock In Treatment worth €6.50! Make sure to keep an eye on the catalogues as there are always brilliant deals, be it reduced prices or free gifts! Click HERE to have a browse thorough the current one.
Here are more of the colours available from the range: (Click for a closer look)
 |
| FYI Fergie used this one!! |
As I said I am really happy with the result and am definitely impressed with Avon's first go at introducing their hair colouring range. Will you be trying it??
Slán!
Laura xo
As I mentioned, I was sent these products by Avons PR Team to try out for myself. I was not asked to review them, but decided to do so myself, as I was so pleased with the outcome. This is my first time reviewing something that was sent to me for free on my blog and I want to let you know that I promise to always be completely honest in my reviews if I am to do so again. I'm not afraid to say if something is terrible and if something is, I sure will let you know! :)


